“Seamlessly connect your water softener with our 1 inch connector.”
Table of Contents
Benefits of Using a 1 Inch Water Softener Connector
Water softeners are essential for removing minerals like calcium and magnesium from hard water, which can cause damage to pipes, appliances, and skin. When installing a water softener, it is important to use the right connectors to ensure a secure and leak-free connection. One popular option is the 1 inch water softener connector, which offers several benefits for homeowners.
One of the main advantages of using a 1 inch water softener connector is its durability. These connectors are typically made from high-quality materials like stainless steel or brass, which are resistant to corrosion and can withstand high water pressure. This means that they are less likely to leak or break over time, providing a reliable connection for your water softener.
In addition to their durability, 1 inch water softener connectors are also easy to install. They come with compression fittings that can be easily tightened by hand, eliminating the need for special tools or professional installation. This makes them a convenient option for homeowners who want to set up their water softener themselves without any hassle.
Furthermore, 1 inch water softener connectors are versatile and can be used with a variety of water softener models. Whether you have a traditional salt-based water softener or a more modern electronic water softener, a 1 inch connector can accommodate different types of systems. This flexibility makes it a practical choice for homeowners who may upgrade or change their water softener in the future.
Another benefit of using a 1 inch water softener connector is its compatibility with standard plumbing fittings. These connectors are designed to fit standard 1 inch pipes, making them easy to integrate into your existing plumbing system. This means that you won’t have to make any major modifications to your pipes or fittings when installing a water softener, saving you time and money on installation costs.
Additionally, 1 inch water softener connectors are designed to provide a tight seal, preventing any leaks or water damage. The compression fittings create a secure connection between the water softener and the plumbing system, ensuring that water flows smoothly without any interruptions. This can help prolong the life of your water softener and prevent costly repairs down the line.
Overall, using a 1 inch water softener connector offers several benefits for homeowners looking to install or upgrade their water softener system. From durability and ease of installation to compatibility and leak prevention, these connectors provide a reliable and efficient solution for connecting your water softener to your plumbing system. Consider investing in a 1 inch water softener connector for your home to enjoy the benefits of softened water and peace of mind knowing that your system is securely connected.
How to Install a 1 Inch Water Softener Connector
Water softeners are essential for maintaining the quality of your water supply by removing minerals that can cause buildup and damage to your plumbing fixtures. If you have a 1-inch water softener connector, you may be wondering how to properly install it to ensure optimal performance. In this article, we will guide you through the steps to install a 1-inch water softener connector.
Before you begin the installation process, it is important to gather all the necessary tools and materials. You will need a pipe cutter, Teflon tape, a wrench, and of course, your 1-inch water softener connector. Make sure to turn off the water supply to your home before starting the installation to prevent any leaks or accidents.
The first step in installing a 1-inch water softener connector is to cut the existing water line where you will be connecting the softener. Use a pipe cutter to make a clean and straight cut to ensure a proper seal. Once the pipe is cut, use a rag to clean off any debris or burrs that may be present.
Next, wrap the male threads of the water softener connector with Teflon tape to create a tight seal. This will help prevent any leaks once the connector is installed. Make sure to wrap the tape in a clockwise direction to ensure that it does not unravel when you screw on the connector.
Now, it is time to attach the water softener connector to the existing water line. Use a wrench to tighten the connector onto the pipe, making sure it is secure and snug. Be careful not to overtighten the connector, as this can cause damage to the threads and result in leaks.
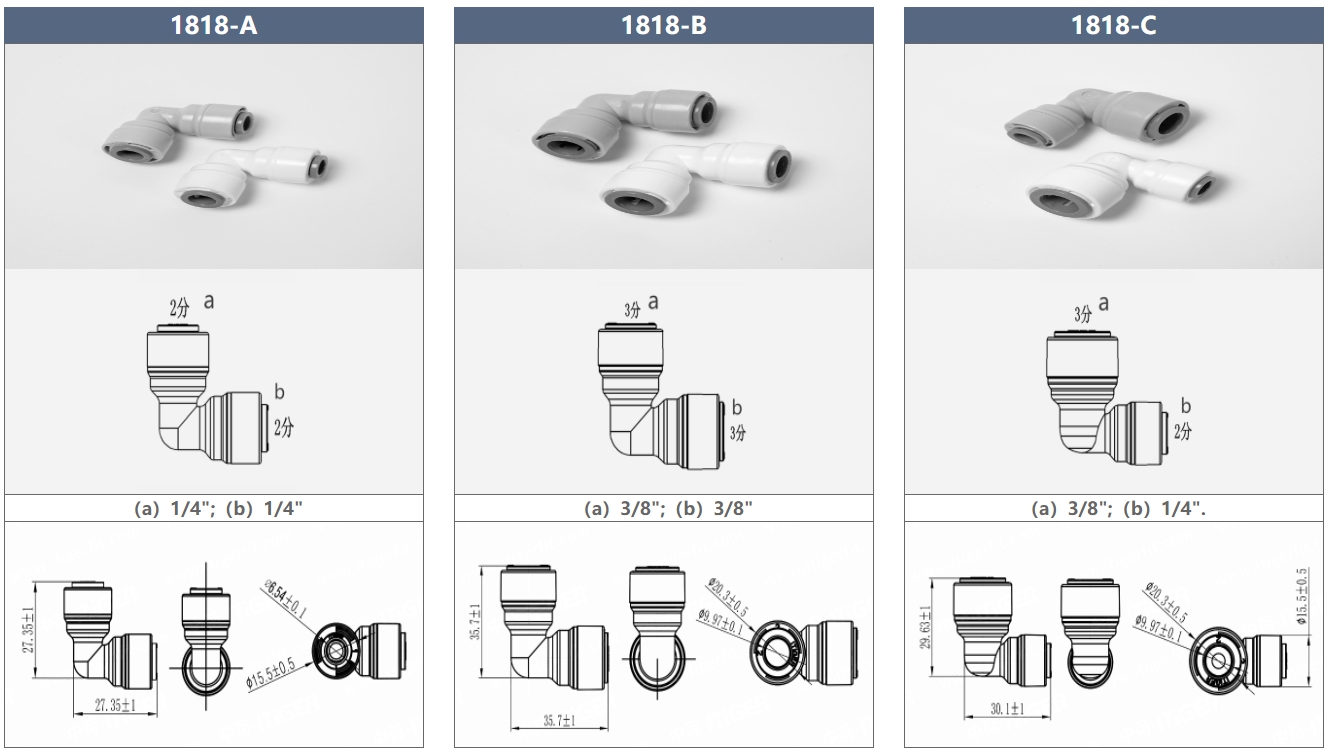
| Model | Tube(a) | Stem(b) |
|---|---|---|
| 1801-A | 1/4 | 1/4 |
| 1801-C | 1/4 | 3/27 |
Once the connector is securely in place, it is important to check for any leaks. Turn on the water supply and inspect the connection for any signs of water seepage. If you notice any leaks, tighten the connector further or reapply Teflon tape to create a better seal.
After ensuring that the connection is leak-free, you can now connect the other end of the water softener connector to the inlet of your water softener. Follow the manufacturer’s instructions for attaching the connector to the softener to ensure proper installation.
Finally, turn on the water supply and check for any leaks or issues with the connection. If everything looks good, you have successfully installed your 1-inch water softener connector. Enjoy the benefits of softened water in your home and rest easy knowing that your plumbing fixtures are protected from mineral buildup.
In conclusion, installing a 1-inch water softener connector is a straightforward process that can be completed with a few simple tools and materials. By following these steps and ensuring a proper seal, you can enjoy the benefits of softened water in your home while protecting your plumbing fixtures from damage.