“قم بتوصيل النظام الكهربائي الخاص بك بسهولة باستخدام قناة PVC.”
Table of Contents
إيجابيات وسلبيات استخدام قناة PVC للتوصيلات الكهربائية
نموذج
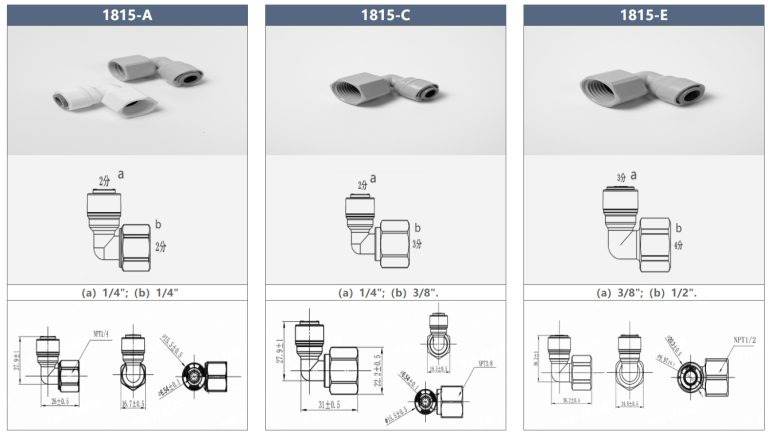
| أنبوب (أ) | الجذعية (ب) | 1801-أ |
|---|---|---|
| 1801-ج | 1/4 | 1/4 |
| دليل خطوة بخطوة حول كيفية توصيل قناة PVC لمشاريع DIY | 1/4 | 3/43 |
تعد قناة PVC خيارًا شائعًا لمشاريع DIY التي تتضمن الأسلاك الكهربائية. إنه متين وخفيف الوزن وسهل العمل به، مما يجعله خيارًا رائعًا للتطبيقات الداخلية والخارجية. يعد توصيل قناة PVC عملية مباشرة يمكن إجراؤها باستخدام عدد قليل من الأدوات والمواد. في هذا الدليل التفصيلي، سنرشدك خلال عملية توصيل قناة PVC لمشاريع DIY الخاصة بك.
الخطوة الأولى في توصيل قناة PVC هي جمع كل المواد والأدوات اللازمة. ستحتاج إلى قناة PVC، وموصلات PVC، وأسمنت PVC، ومنشار أو قاطع PVC، وشريط قياس، وقلم رصاص. تأكد من اختيار الحجم الصحيح للقناة والموصلات لمشروعك.
بمجرد جمع كل المواد، فإن الخطوة التالية هي قياس قناة PVC وقطعها إلى الطول المطلوب. استخدم شريط قياس لقياس طول القناة اللازمة لمشروعك وحدد نقطة القطع بقلم رصاص. ثم استخدم منشارًا أو قاطعة PVC لقطع القناة إلى الطول المطلوب. تأكد من قطع القناة بشكل مستقيم لضمان التوصيل المناسب.
بعد قطع القناة إلى الطول الصحيح، فإن الخطوة التالية هي توصيل موصلات PVC بالقناة. ضع الأسمنت PVC على الجزء الداخلي للموصل وعلى الجزء الخارجي من القناة. أدخل القناة في الموصل وقم بلفها لضمان اتصال آمن. أمسك القناة والموصل في مكانهما لبضع ثوان للسماح للأسمنت بالتماسك.
كرر هذه العملية لكل نقطة اتصال في مشروعك. تأكد من التحقق مرة أخرى من محاذاة القناة والموصلات لضمان الملاءمة المناسبة. من المهم العمل بسرعة عند استخدام أسمنت PVC، لأنه يتماسك بسرعة.
بمجرد إجراء جميع التوصيلات، اترك أسمنت PVC حتى يجف ويعالج وفقًا لتعليمات الشركة المصنعة. يستغرق هذا عادةً حوالي 24 ساعة. بمجرد أن يجف الأسمنت، تصبح قناة PVC جاهزة للاستخدام في مشروع DIY الخاص بك.
يعد توصيل قناة PVC عملية بسيطة يمكن إجراؤها بواسطة أي شخص لديه مهارات DIY الأساسية. باتباع هذا الدليل التفصيلي، يمكنك بسهولة توصيل قناة PVC لمشاريع الأسلاك الكهربائية الخاصة بك. تذكر أن ترتدي دائمًا معدات السلامة، مثل القفازات والنظارات الواقية، عند العمل مع قنوات PVC والأسمنت.
في الختام، تعد قناة PVC خيارًا متعدد الاستخدامات ومتينًا لمشاريع DIY التي تتضمن الأسلاك الكهربائية. باتباع الخطوات الموضحة في هذا الدليل، يمكنك بسهولة توصيل قناة PVC لمشاريعك. تذكر قياس القناة وقطعها بدقة، واستخدام الأسمنت PVC للتوصيلات الآمنة، والسماح للأسمنت بأن يجف قبل استخدام القناة. مع قليل من الوقت والجهد، يمكنك بنجاح توصيل قناة PVC لمشروعاتك اليدوية.
PVC conduit is a popular choice for DIY projects that involve electrical wiring. It is durable, lightweight, and easy to work with, making it a great option for both indoor and outdoor applications. Connecting PVC conduit is a straightforward process that can be done with just a few tools and materials. In this step-by-step guide, we will walk you through the process of connecting PVC conduit for your DIY projects.
The first step in connecting PVC conduit is to gather all the necessary materials and tools. You will need PVC conduit, PVC connectors, PVC cement, a hacksaw or PVC cutter, a tape measure, and a pencil. Make sure to choose the correct size of conduit and connectors for your project.
Once you have gathered all the materials, the next step is to measure and cut the PVC conduit to the desired length. Use a tape measure to measure the length of conduit needed for your project and mark the cutting point with a pencil. Then, use a hacksaw or PVC cutter to cut the conduit to the desired length. Make sure to cut the conduit straight to ensure a proper connection.
After cutting the conduit to the correct length, the next step is to connect the PVC connectors to the conduit. Apply PVC cement to the inside of the connector and the outside of the conduit. Insert the conduit into the connector and twist it to ensure a secure connection. Hold the conduit and connector in place for a few seconds to allow the cement to set.
Repeat this process for each connection point in your project. Make sure to double-check the alignment of the conduit and connectors to ensure a proper fit. It is important to work quickly when using PVC cement, as it sets fast.
Once all the connections have been made, allow the PVC cement to dry and cure according to the manufacturer’s instructions. This usually takes about 24 hours. Once the cement has dried, your PVC conduit is ready for use in your DIY project.
Connecting PVC conduit is a simple process that can be done by anyone with basic DIY skills. By following this step-by-step guide, you can easily connect PVC conduit for your electrical wiring projects. Remember to always wear safety gear, such as gloves and goggles, when working with PVC conduit and cement.
In conclusion, PVC conduit is a versatile and durable option for DIY projects that involve electrical wiring. By following the steps outlined in this guide, you can easily connect PVC conduit for your projects. Remember to measure and cut the conduit accurately, use PVC cement for secure connections, and allow the cement to dry before using the conduit. With a little bit of time and effort, you can successfully connect PVC conduit for your DIY projects.