Table of Contents
Importance of Regular Calibration for Conductivity Meters in Pharmaceutical Industry
In the pharmaceutical industry, accuracy and precision are of utmost importance when it comes to measuring the conductivity of solutions. Conductivity meters are widely used in pharmaceutical laboratories to ensure that the solutions being tested meet the required standards. To maintain the accuracy of these measurements, regular calibration of conductivity meters is essential.
Calibration is the process of comparing the readings of a measuring instrument to a known standard to ensure its accuracy. In the case of conductivity meters, calibration involves adjusting the instrument to match the conductivity values of standard solutions. This ensures that the meter is providing accurate and reliable measurements.
The United States Pharmacopeia (USP) sets guidelines for the calibration of conductivity meters in pharmaceutical laboratories. According to USP guidelines, conductivity meters should be calibrated at regular intervals to ensure their accuracy. The frequency of calibration depends on the usage of the meter and the criticality of the measurements being made.
Regular calibration of conductivity meters is important for several reasons. Firstly, it ensures the accuracy of the measurements being made. Inaccurate measurements can lead to incorrect conclusions about the quality of the solutions being tested, which can have serious implications for the pharmaceutical industry. By calibrating conductivity meters regularly, pharmaceutical laboratories can ensure that their measurements are reliable and consistent.
Secondly, regular calibration helps to identify any drift or changes in the performance of the conductivity meter. Over time, factors such as temperature, humidity, and wear and tear can affect the accuracy of the meter. By calibrating the meter regularly, these changes can be detected and corrected before they impact the quality of the measurements.
Thirdly, regular calibration of conductivity meters is a requirement for compliance with regulatory standards. Pharmaceutical laboratories are required to adhere to strict guidelines set by regulatory bodies such as the USP to ensure the quality and safety of their products. Regular calibration of conductivity meters is a key part of meeting these standards and demonstrating the reliability of the measurements being made.
To calibrate a conductivity meter as per USP guidelines, a series of standard solutions with known conductivity values are used. The meter is adjusted to match the conductivity values of these standard solutions, ensuring that it is providing accurate measurements. The calibration process should be carried out by trained personnel following a standardized procedure to ensure consistency and reliability.
In conclusion, regular calibration of conductivity meters is essential for ensuring the accuracy, reliability, and compliance of measurements in the pharmaceutical industry. By following USP guidelines and calibrating conductivity meters at regular intervals, pharmaceutical laboratories can maintain the quality and safety of their products. Calibration is a critical part of the quality control process in pharmaceutical laboratories and should not be overlooked.
Step-by-Step Guide to Calibrating Conductivity Meters According to USP Standards
Calibrating a conductivity meter is an essential step in ensuring accurate and reliable measurements of conductivity in various solutions. The United States Pharmacopeia (USP) has set standards for the calibration of conductivity meters to ensure the accuracy and consistency of measurements in pharmaceutical and other industries. In this article, we will provide a step-by-step guide on how to calibrate a conductivity meter according to USP standards.
The first step in calibrating a conductivity meter is to gather all the necessary equipment. This includes the conductivity meter, calibration standards (typically 1.41 mS/cm and 12.88 mS/cm), distilled water, a clean beaker, and a stirrer. It is important to ensure that the calibration standards are fresh and have not expired, as this can affect the accuracy of the calibration.
Once you have gathered all the equipment, the next step is to prepare the calibration standards. Start by rinsing the beaker with distilled water to remove any impurities. Then, pour a small amount of the 1.41 mS/cm calibration standard into the beaker and place it on the conductivity meter. Make sure the sensor is fully immersed in the solution and allow it to stabilize for a few minutes.
After the meter has stabilized, adjust the calibration knob on the meter until the reading matches the expected value of 1.41 mS/cm. If the reading does not match, repeat the process until the meter is properly calibrated. Once the calibration at 1.41 mS/cm is complete, rinse the sensor with distilled water and repeat the process with the 12.88 mS/cm calibration standard.
It is important to note that the calibration process may vary depending on the type of conductivity meter you are using. Refer to the manufacturer’s instructions for specific guidelines on calibrating your particular model. Additionally, it is recommended to calibrate the conductivity meter regularly, as environmental factors and normal wear and tear can affect the accuracy of the measurements.
In addition to calibrating the conductivity meter with calibration standards, it is also important to perform a slope verification test. This test ensures that the meter is accurately measuring the conductivity of the solution across a range of values. To perform the slope verification test, prepare a series of calibration standards with increasing conductivity values (e.g., 1.41 mS/cm, 5.0 mS/cm, and 12.88 mS/cm) and measure the conductivity of each solution.
Plot the measured values against the expected values and calculate the slope of the line. The slope should be close to 1, indicating that the meter is accurately measuring the conductivity of the solutions. If the slope deviates significantly from 1, it may indicate that the meter needs to be recalibrated or serviced.
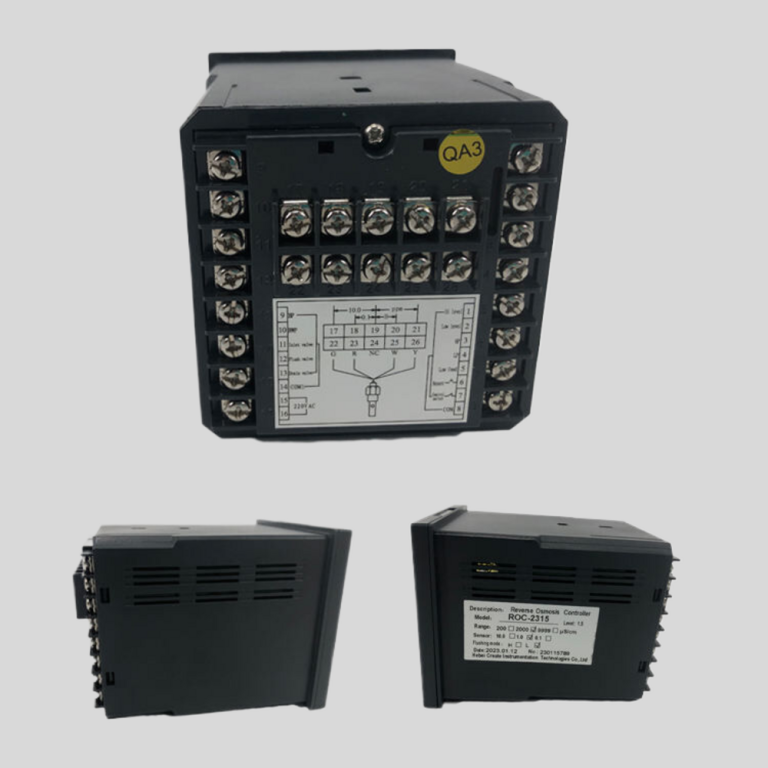
| ROC-2315 ro controller instruction (220V) | |||
| Model | ROC-2315 | ||
| Single detection | Dry Contact input | Raw water no water protection | |
| (six channels) | Low-pressure protection | ||
| \u3000 | High-pressure protection | ||
| \u3000 | Pure water tank high\u00a0level | ||
| \u3000 | External control mode signal | ||
| \u3000 | Running reset | ||
| Control port | Dry Contact output | Raw water pump | SPST-NO low capacity : AC220V/3A Max ;AC110V/5A Max |
| (five channels) | Inlet valve | \u3000 | |
| \u3000 | High pressure pump | \u3000 | |
| \u3000 | Flush valve | \u3000 | |
| \u3000 | Conductivity over-limit drainge valve | \u3000 | |
| Measurement detection point | Product water conductivity and with Automatic Temperature compensation (0\uff5e50\uff09\u2103 | ||
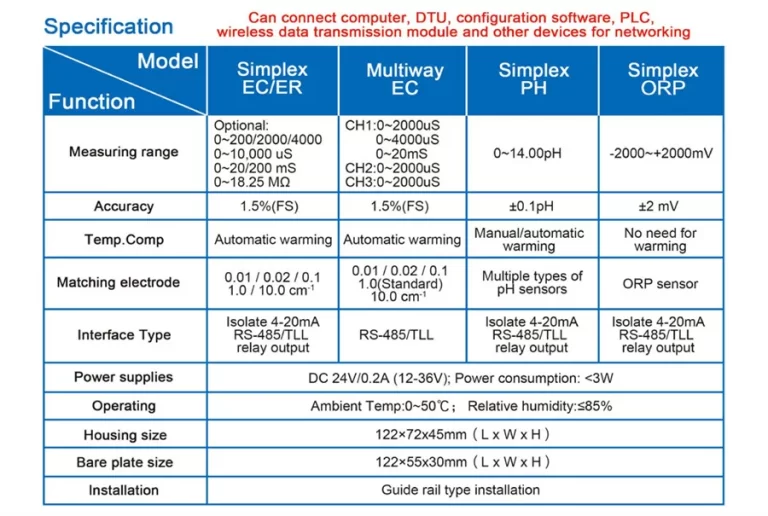
| Measurement range | Conductivity : 0.1~200\u03bcS/cm/1~2000\u03bcS/cm/10~999\u03bcS/cm (with different conductivity sensor ) | ||
| Product water temp. : 0~50\u2103 | |||
| Accuracy | 1.5 level | ||
| Power supply | AC220V (\u00b110%)\u00a0,\u00a050/60Hz | ||
| Working environment | Temperature:\uff080\uff5e50\uff09\u2103\u00a0; | ||
| Relative Humidity :\u226485%RH\u00a0(no condensation ) | |||
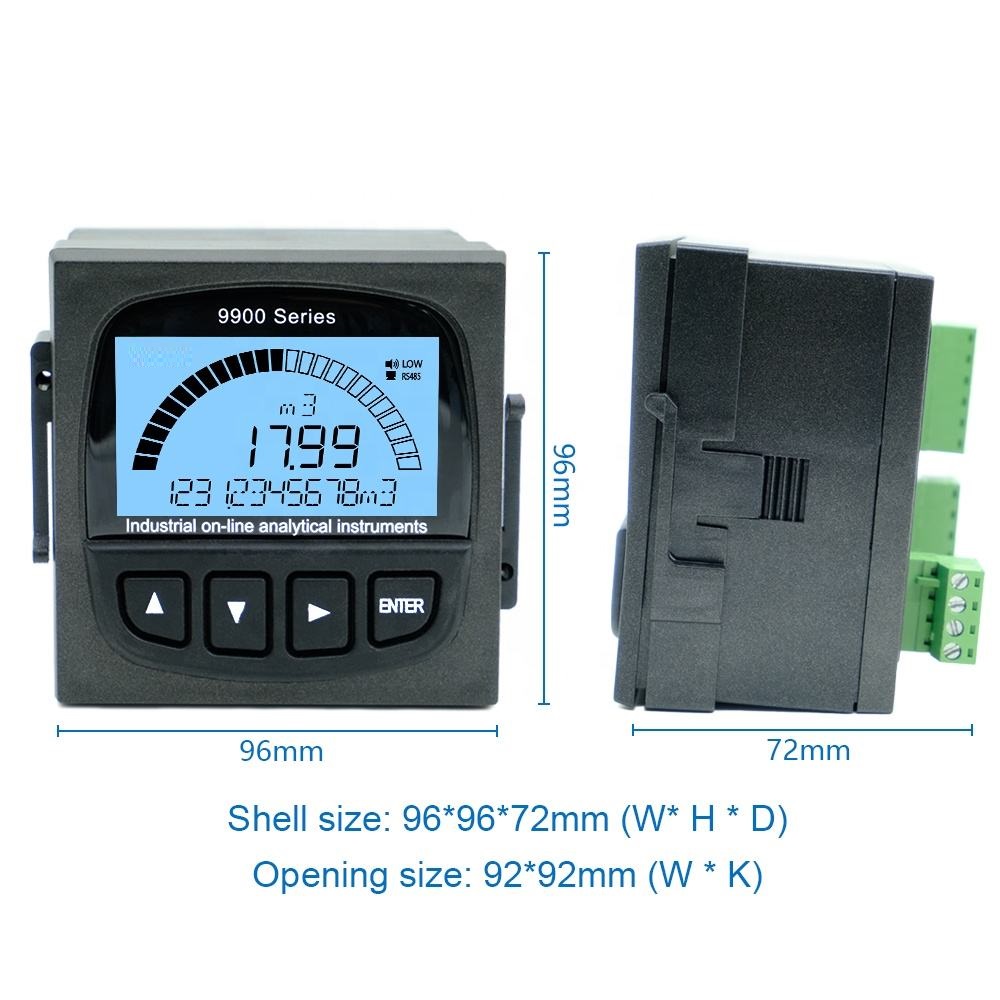
| Dimension | 96\u00d796\u00d7130mm( height \u00d7width\u00d7depth) | ||
| Hole size | 91\u00d791mm\uff08height \u00d7width\uff09 | ||
| Installation | Panel mounted ,fast installtion | ||
| Certification | CE | ||
In conclusion, calibrating a conductivity meter according to USP standards is a critical step in ensuring accurate and reliable measurements of conductivity in various solutions. By following the step-by-step guide outlined in this article and performing regular calibration and slope verification tests, you can maintain the accuracy and consistency of your conductivity measurements. Remember to consult the manufacturer’s instructions for specific guidelines on calibrating your particular conductivity meter.