Table of Contents
Understanding the Basics of Using a Valve Spring Compressor
A valve spring compressor is an essential tool in the realm of automotive repair and maintenance. It is primarily used to remove and install the valve spring, a critical component in an internal combustion engine, without causing damage to the engine. Understanding the basics of using a valve spring compressor can be a game-changer for both professional mechanics and DIY enthusiasts alike.
The valve spring compressor is designed to exert pressure on the valve spring, thereby compressing it. This compression allows for the removal of the valve keepers, small clips that hold the valve and spring together. Once the keepers are removed, the spring can be safely taken out for inspection or replacement. The process is reversed for installation, with the compressor used to hold the spring in place while the keepers are reinserted.
Before using a valve spring compressor, it is crucial to ensure that the engine is cool and that all necessary safety precautions have been taken. This includes wearing protective eyewear and gloves, as well as ensuring that the work area is clean and well-lit. It is also important to have a clear understanding of the engine’s layout and the location of the valve springs.
To use the valve spring compressor, one must first position it correctly. The tool should be placed over the valve spring with the hooks gripping the top and bottom of the spring. The handle of the compressor is then slowly turned, applying pressure to the spring and causing it to compress. This action reveals the valve keepers, which can be carefully removed with a magnet or a pair of needle-nose pliers.
Once the keepers have been removed, the handle of the compressor can be slowly released, allowing the spring to expand. The spring can then be removed from the engine for inspection or replacement. If a new spring is being installed, it is placed in the correct position, and the compressor is used to compress it. The keepers are then reinserted, and the compressor is slowly released, allowing the spring to expand and hold the keepers in place.
| Model: Manual Softener Valve | MSD2 | MSS2 | MSD4 | MSD4-B | MSD10 |
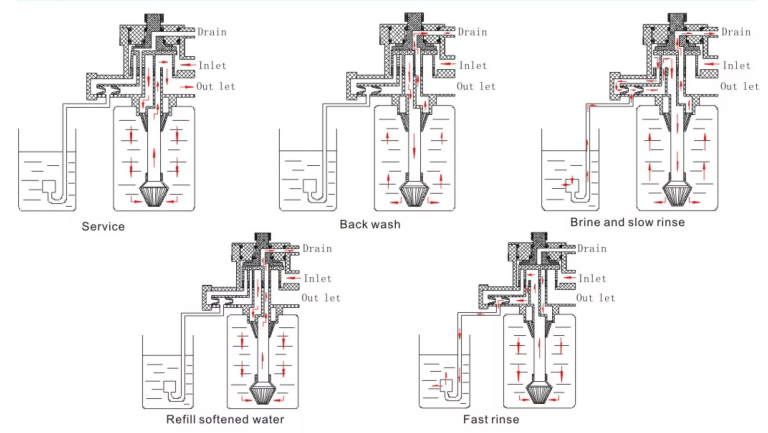
| Working Position | Filter-> Back Wash-> Fast Rinse ->Filter | ||||
| Regeneration mode | Manual | ||||
| Inlet | 3/4” | 3/4” | 1” | 1” | 2” |
| Outlet | 3/4” | 3/4” | 1” | 1” | 2” |
| Drain | 3/4” | 3/4” | 1” | 1” | 2” |
| Base | 2-1/2” | 2-1/2” | 2-1/2” | 2-1/2” | 4” |
| Riser pipe | 1.05” OD | 1.05” OD | 1.05” OD | 1.05” OD | 1.5”D-GB |
| Water Capacity | 2m3/h | 2m3/h | 4m3/h | 4m3/h | 10m3/h |
| Working Pressure | 0.15-0.6Mpa | ||||
| Working Temperature | 5-50° C | ||||
| Power Supply | No need Power | ||||
While using a valve spring compressor may seem straightforward, it requires a certain level of skill and precision. The compressor must be handled carefully to avoid damaging the engine or causing injury. It is also important to ensure that the spring is correctly positioned before and after compression, and that the keepers are securely in place.
In conclusion, a valve spring compressor is a vital tool for anyone involved in engine repair or maintenance. It allows for the safe and efficient removal and installation of valve springs, a task that would be nearly impossible without it. By understanding the basics of using a valve spring compressor, one can perform this task with confidence and precision. Whether you’re a seasoned professional or a DIY enthusiast, mastering the use of this tool can significantly enhance your automotive repair skills.
Step-by-Step Guide to Using a Valve Spring Compressor
A valve spring compressor is an essential tool for those who are involved in the maintenance and repair of internal combustion engines. This tool is specifically designed to remove and install the valve spring, a critical component of an engine that helps control the opening and closing of the engine’s valves. The process of using a valve spring compressor can be complex, but with a step-by-step guide, it becomes manageable even for those who are new to this task.
To begin with, it is important to ensure that the engine is cool before starting the process. This is because working on a hot engine can lead to burns and other injuries. Once the engine has cooled down, the next step is to remove the valve cover. This is usually done by unscrewing the bolts that hold it in place. Once the valve cover is removed, the valve springs and the rocker arms will be exposed.
The valve spring compressor is then used to compress the valve springs. This is done by placing the tool over the spring and turning the handle to apply pressure. It is important to apply steady and even pressure to avoid damaging the spring. Once the spring is compressed, it becomes easy to remove the valve keepers, which are small metal clips that hold the spring in place.
Once the valve spring has been removed, it can be replaced or repaired as necessary. If a new spring is being installed, it is important to ensure that it is the correct size and type for the engine. The new spring can then be placed in the seat, and the valve spring compressor can be used again to compress it.
| Category | Type | Feature | Model | Inlet/Outlet | Drain | Base | Riser Pipe | Brine Line Connector | Water Capacity m3/h |
| automatic softener valve | Upflow Type | Refill Softener Water | ASS2 | 1/2″, 3/4″, 1″ | 1/2″ | 2.5″ | 1.05″ OD | 3/8″ | 2 |
The valve keepers can then be reinstalled. This is usually done by placing them in their slots on the valve stem and then releasing the pressure from the valve spring compressor. The spring will expand and hold the keepers in place. The valve cover can then be reinstalled, and the engine can be started to ensure that everything is working correctly.
In conclusion, using a valve spring compressor is a task that requires patience and precision. It is important to follow each step carefully to avoid damaging the engine or the tool. With practice, however, it becomes a straightforward process that can save time and money in engine repairs and maintenance. It is always recommended to consult with a professional or refer to the engine’s service manual for specific instructions and safety guidelines.